本篇文章是博主简单整理。
我们希望充分测试Linux,OpenBSD,FreeBSD和类Unix服务器以获得高负载并监控压力下的健康状况。如何在Linux或类Unix系统上使用压力测试工具来测试CPU,内存,I / O和磁盘读写能力呢?
那么恭喜,本文就是为你准备的。本文就是学习stress ,stress-ng ,cpuburn如何使用。

安装环境:CentOS 6.x/7.x
[root@localhost ~]# wget https://people.seas.harvard.edu/~apw/stress/stress-1.0.4.tar.gz
[root@localhost ~]# tar zxf stress-1.0.4.tar.gz
[root@localhost ~]# cd stress-1.0.4
[root@localhost stress-1.0.4]# ./configure
[root@localhost stress-1.0.4]# make
[root@localhost stress-1.0.4]# make install
[root@localhost stress-1.0.4]# stress --version
stress 1.0.4
测试命令示例:
stress --cpu 8 --io 4 --vm 2 --vm-bytes 128M --timeout 10s
备注:
--cpu 8 指的是测试8个cpu,可以根据服务器配置自行修改
--timeout 10s 指的是测试时间10s,如果需要测试更长时间,增大时间值即可
- 【强烈推荐】cpuburn是一个测试CPU超频稳定性的测试工具,程序会加热任何X86 CPU到它所能承受最大工作温度,它可以使用户在实际应用中加速cpu,即使在压力大的情况下也可以保证稳定性。
cpuburn使用简单,下载即可使用,附图一张即可知道其如何使用。
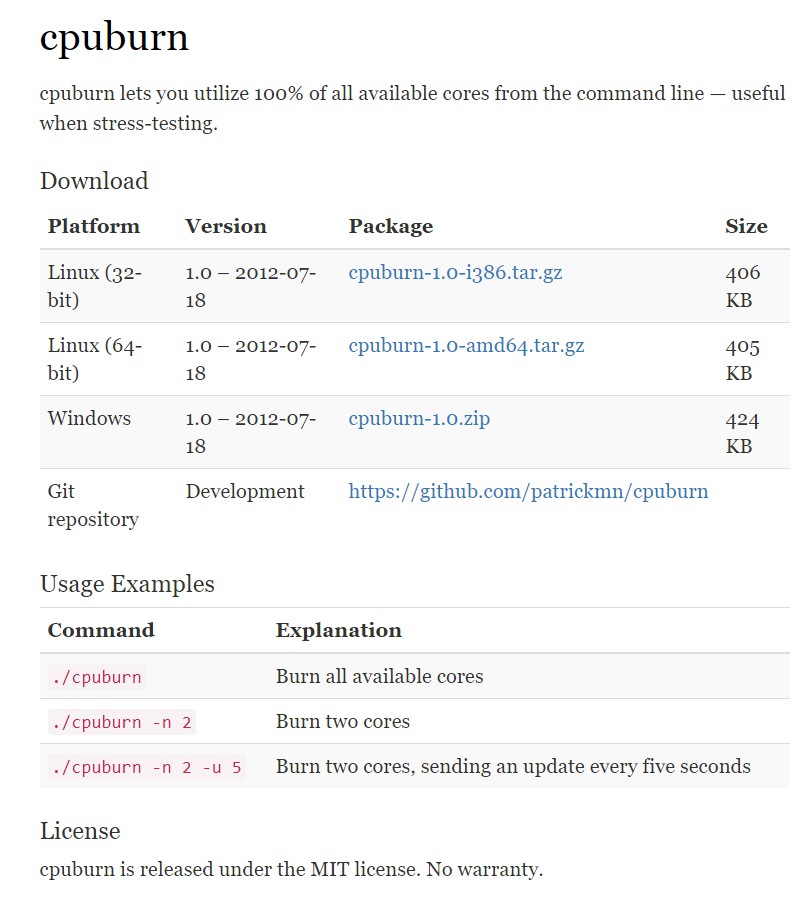
cpuburn使用简单,直接:
./cpuburn
即可刷满所有核心进行处理器稳定性测试。
相关更多资源请参考下方资源,后续有时间我会继续补充更新。
参考来源:
Stress Test CPU and Memory (VM) On a Linux / Unix With Stress-ng
How to Impose High CPU Load and Stress Test on Linux Using ‘Stress-ng’ Tool
整理来源:
Linux系统优化与调试之二:压力测试神器stress-ng
文章的脚注信息由WordPress的wp-posturl插件自动生成

 微信扫一扫,打赏作者吧~
![[已解决]nc命令报错 close: Bad file descriptor](http://www.jyguagua.com/wp-content/themes/begin/timthumb.php?src=http://www.jyguagua.com/wp-content/uploads/2022/03/Snipaste_2022-03-18_20-16-48.png&w=280&h=210&zc=1)
![[已解决]SecureCRT/SSH 连接Linux缓慢](http://www.jyguagua.com/wp-content/themes/begin/timthumb.php?src=http://www.jyguagua.com/wp-content/uploads/2020/07/ssh_slow.jpg&w=280&h=210&zc=1)
![[转载]Linux的tickless设置](http://www.jyguagua.com/wp-content/themes/begin/timthumb.php?src=http://www.litrin.net/wp-content/uploads/2018/11/kernel_menuconfig_tickless-1.png&w=280&h=210&zc=1)
![[整理]鲲鹏性能优化十板斧(五)——应用程序性能调优<TaiShan特战队出品>](http://www.jyguagua.com/wp-content/themes/begin/timthumb.php?src=http://www.jyguagua.com/wp-content/uploads/2020/03/1-4.jpg&w=280&h=210&zc=1)